| Info |
|---|
The Google Photos app will be removed from CNU Google accounts on Jan. 16, 2025. Because CNU does not have administrative control over the content placed in the Photos app for university Google accounts, once the Photos app is removed, the university will not be able to retrieve any files left in your account. Moreover, any data left in Photos after the app is removed will count against your Google storage allocation. |
| Note |
|---|
All users need to do the following: |
...
1). Disable any automatic photo uploads or syncing from your phone or other devices to your CNU Google Photos app
...
.
Expand title Turn Off Photo Sync
...
| (Click to Expand
...
) - Open the Google Photos app .
- Sign in to your CNU Google Account.
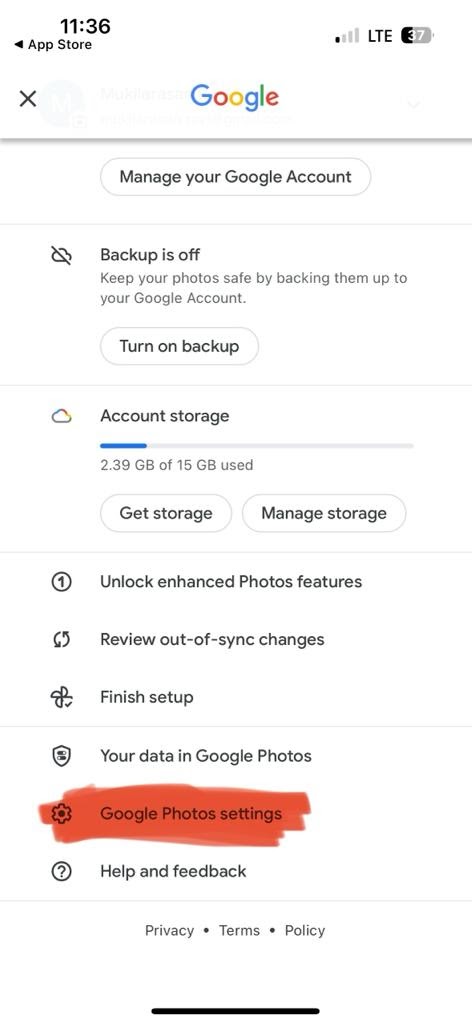
- At the top right, tap your Profile picture or Initials.
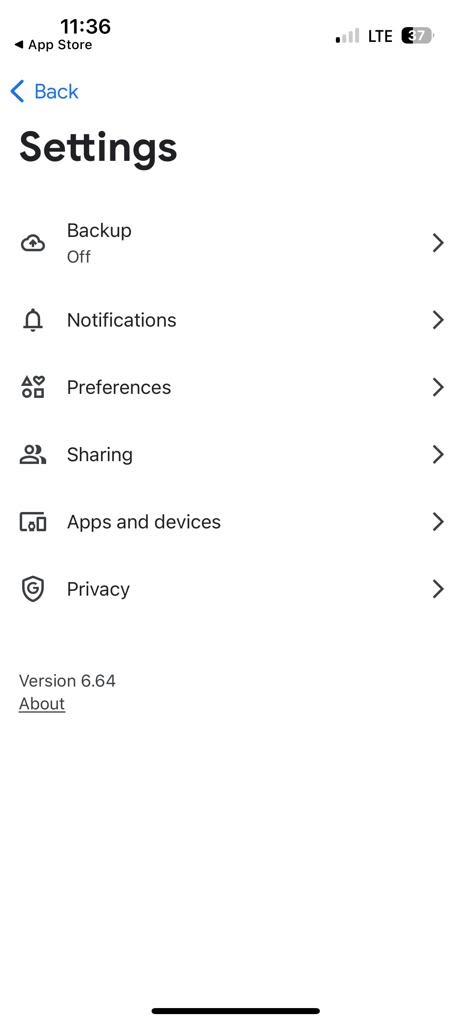
- Tap the Google Photos settings > Backup.
- Turn Backup off.
2). Export and move any files that you wish to keep from the Photos app on your CNU Google account to an alternative storage location.
Expand title Using Google Takeout to Download Data
...
- Visit Google Account Data and Privacy.
- Scroll down until you find the Download or delete your data section.
...
- Click Download your data.
- Scroll through the first section labeled Select data to include and choose which products you want to download (Ensure to include all Photos).
Info You may have issues if the drive is over 100 GB. If you experience difficulties, try downloading the data directly.
To help ensure the best transfer, it is also recommended that you delete any unwanted files first to limit the amount of data you are trying to export.
Also, ensure that you are not downloading business data to a personal account as it may contain sensitive information.
...
- Once you have made your selections, click Next step.
- Select your preferred Delivery Method, Frequency, and File Type & Size. It is recommended to use a file size of 10 GB.
- Click Create Export.
- This process
...
- has been known to take up to
...
- a day or so.
- A box will appear labeled Export Progress, allowing you to cancel the export or create another one.
You will receive an email when the process is complete.
Expand title Transfer Data to a Personal Google Account
...
Info AT THE TIME OF THE PUBLICATION OF THIS ARTICLE, THIS OPTION WILL ALSO TRANSFER ALL "SHARED WITH ME" FILES. THIS CANNOT BE TURNED OFF. IT COULD LEAD TO UNEXPECTED SENSITIVE FILES BEING TRANSFERRED AND TO MORE FILES BEING TRANSFERRED THAN YOU HAVE AVAILABLE STORAGE.
ALSO, AS GOOGLE STATES, THIS CAN TAKE UP TO A WEEK, AND WE CANNOT STOP IT ONCE YOU HAVE INITIATED THE TRANSFER.
- Visit Google Account Data and Privacy.
- Ensure you are logged in to the account you would like to migrate data out of.
- Click Start Transfer.
- Enter the email address for the data's destination (the address must be a Gmail account).
- Click Send Code.
- Go to the inbox for the email address you entered and locate the email sent by Google to verify your account.
- Click the link in the email to view the code.
- Copy the code and type it in the text box on the transfer page.
- Select the content you want to transfer. AT THE TIME OF THE PUBLICATION OF THIS ARTICLE, THIS OPTION WILL ALSO TRANSFER ALL "SHARED WITH ME" FILES. THIS CANNOT BE TURNED OFF. IT COULD LEAD TO UNEXPECTED SENSITIVE FILES BEING TRANSFERRED AND TO MORE FILES BEING TRANSFERRED THAN YOU HAVE AVAILABLE STORAGE. ALSO, AS GOOGLE STATES, THIS CAN TAKE UP TO A WEEK, AND WE CANNOT STOP IT ONCE YOU HAVE INITIATED THE TRANSFER.
- Click Start Transfer.
This process can take up to several days depending on the amount of data that needs to be transferred.
- You will receive emails to both accounts informing you that the transfer has started.
- To view transfer progress:
- Navigate back to Google Account Data and Privacy.
- Click Start Transfer.
- Click View History.
- As the data transfers you may receive notifications about unopened emails as they are transferred to your inbox.
- When the transfer is completed, you will find your data in different folders:
- Drive data can be found at Google Drive under the My Drive drop-down.
- You will see a folder with the email address of your Virginia Tech account next to the date of transfer.
- Gmail data can be found at Gmail on the left side of the page.
- You will see a tag with the date of the transfer.
- Drive data can be found at Google Drive under the My Drive drop-down.
Expand title Moving Individual Files from Google Drive
...
& Photos Section Column Visit Google Drive.
- Right-click the file you want to migrate out of Google Drive.
- To move multiple individual files at once, hold the
- Right-click the file you want to migrate out of Google Drive.
...
- Ctrl
...
- key while left clicking the files you want to move, then right-click on any of them.
...
- Click Download.
- Downloading multiple files will place all of them in a single zip folder and may take longer.
Data will
- Click Download.
...
download to your computer.
Column Visit Google Photos.
- Click the file you want to migrate out of Google Photos.
- To download (or zip) multiple files at once:
- Click the blue checkbox next to the very first photo
- Press the END key on your keyboard (typically above the arrow keys)
- Press & hold the SHIFT key
- Click the last photo's blue checkbox.
- To download (or zip) multiple files at once:
All photos should be selected.
At the top right corner of the page, there are 3 blue vertical dots. Click that. A submenu will appear. Click Download.
Your photos will be prepared (zipped) and you will be prompted to save your files.
- Click the file you want to migrate out of Google Photos.
3). Once you have exported the needed files, delete all contents from the Photos app until you have zero data remaining within the app. Delete from Trash, as well.
Expand
...
| title | User & Data Backup |
|---|
Taking the above steps will ensure that you do not lose important files.
To help users export their files from Google Photos, we has created the following resources:
- Google Photos export and relocation guide for guidance on finding alternative storage locations and transferring personal photos out of your Virginia Tech Google account.
- How to move files out of your Google account, including how to use Google Takeout to download data. You can also watch the video below with instructions for Google Takeout.
- Transferring Photos from VT Google Photos storage to a personal account, including how to transfer photos via “partner sharing.”
...
title Moving content to Trash | Purging Trash Warning To remove a file from your Drive, you can put it in your trash. The file will stay in your trash for 30 days before being automatically deleted.
If you're the owner of the file, others can access it until you permanently delete the file. If you're not the owner, others can access the file even if you empty your trash.
After you delete a file, anyone you've shared the file with loses access to it. If you want others to still access the file, you can give ownership to someone else.
Section border true Column Computer
- In a browser, go to photos.google.com.
Select bulk individual files not in albums:
1) Click the blue checkbox next to the very first photo
2) Press the END key on your keyboard (typically above the arrow keys)
3) Press & hold the SHIFT key
4) Click the last photo's blue checkbox.All photos should be selected.
At the top right corner of the page, click the Trash icon.
Click Move to trash.- On the left menu panel, click Trash.
On the top right corner of the page, click Empty trash.
- Permanently delete files by clicking Empty Trash.
Column Android
- On your Android phone or tablet, open the Google Drive app.
- At the bottom right, tap Files .
- Next to the file you want to delete, tap More Remove.
- In the upper left, tap Menu Trash.
- Next to the file you'd like to delete, tap More Delete forever.
Column iOS
- On your iPhone or iPad, open the Google Drive app.
- Next to the file you want to delete, tap More .
- At the bottom, tap Remove.
Individual files:
- In the upper left, tap Menu .
- Tap Trash.
- Next to the file you'd like to delete, tap More .
- Tap Delete forever.
Bulk:
- In the upper left, tap Menu .
- Tap Trash.
- Make sure that there are no files that you'll want later.
- In the top right, tap More .
- Tap Empty trash.


