Throughout your time as an employee at Christopher Newport University, you may be given a variety of documents that require filling in and signing. Depending on the document, you may also have to deliver these documents electronically, rather than in hard copy. The following programs allow you to consolidate this process by filling in and signing documents in an electronic format, which can then be saved and sent directly.
PCs
Open the PDF document or form in Acrobat or Acrobat Reader.
Click Fill & Sign in the right pane, or click the Fill & Sign in the toolbar.
The specific tools and options for Fill and Sign are then displayed in the toolbar. Use them to fill out your form:
Using Typed Annotations
Click the "Add Text" button, then the location on which you wish to sign the form. This will generate a text box in which you can type your name, along with some basic buttons that will allow you to change the size of the text or delete the text box entirely.
Clicking outside of the text box will exit it, while clicking on the text again will allow you to re-enter and edit the text already entered. Once this document has been saved and sent to another user, the text box will be locked and uneditable for new users.
Add Manual Signature
- You can also add a handwritten signature for your use within Adobe Reader. To do so, click on the "Sign Yourself" button, then select either "Add Signature" or "Add Initials", depending on the type of signature you need to add.
- You can also add a handwritten signature for your use within Adobe Reader. To do so, click on the "Sign Yourself" button, then select either "Add Signature" or "Add Initials", depending on the type of signature you need to add.
- A box will appear allowing you to create a signature using one of three options
- if you select "Type", typing in the box will create a version of your typed signature that mimicks the style of handwriting of your choice. While functionally similar to just typing text using the previous tool, the font change can differentiate the text from the rest of the document.
- If you select "Draw", you will have the option to hand-write your own signature into the box. This is best recommended for users who have a touch-screen monitor.
- If you select "Image", you can upload an image file of your choice from your computer to serve as your signature. This can then be used with a photograph of your physical signature.
Clicking "Apply" will add the signature to your document to the location of your choosing.
-
- Many PDF forms may be sent to you with pre-designated fields that need to be filled in before returning. For a checkbox or a radio button, click in the field to select the option. For text fields, hover the mouse to display the detected field and click inside to start typing.
CIf you see no blue box, that means it's a flat form. You can manually fill or add text by adding your own text field.
- Click Add Text in the toolbar. Click at the place in the document where you want to add the text, and then start typing.
- Use the field toolbar to make appropriate changes:
- To resize a field, use the font up or down button in the toolbar - the first two buttons from left.
- To move a field, move your pointer closer to field border until you see the drag handle, and then hold and move the field as required.
- To delete a field or typed text, click the trash button.
- To convert a normal text field into the comb field or vice versa, click the comb button - the second button from the right.
- To use annotations or symbols, click the Options menu and select the annotation.
- Use Comb fields to fill or add text in continuous boxes in a line/row. The Comb field spreads the user-entered text evenly across the width of the text field, as shown below. While you are typing, if the characters do not fit in each box, adjust the spacing with the grab handle where the resize here points in the image above.
- Use Crossmark, Checkmark, and Dot to fill in check boxes and radio buttons. Use the Circle to circle text or the Line to strike out text. Click an annotation in the toolbar to select it, and then click on the form where you want to place the annotation. (Each click places the selected annotation at the respective location on the form.)
Macs
MacOS computers come with a built-in function designed to allow users to electronically sign documents in the Preview application. To sign a document in macOS, first open the PDF document in the Preview application.
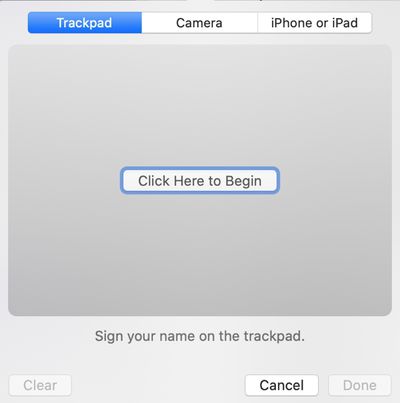
In menu bar, go to Tools → Annotate → Signature → Manage Signatures. A mini-window will open, allowing you three options for adding a signature to the document.
If you are signing for the first time, you can choose to either draw your signature digitally using your trackpad, sign a piece of paper and scan it through your Mac’s camera, or draw your signature digitally using your iPhone or iPad.
To use your trackpad, select Create Signature → Trackpad and sign. Click Done when finished.
To use your Mac’s camera to capture a physical signature, select Create Signature → Camera and hold a signed piece of paper up to the camera. Once scanned, click Done.
To use your iPhone or iPad, select Create Signature → iPhone or iPad and sign using your mobile device. Tap Done when finished.
Now, click the signature icon in the toolbar and select the signature just created. Click on the location in the PDF where you want to place the signature. Save the PDF.


