Technical Guidance for Alternative Instruction
- Janna Dougherty
- Will White
The University provides Google Meet for all videoconferencing needs, including synchronous online teaching. Meet provides a full suite of tools, including screensharing, recording, breakout groups and polling. This quick start guide will allow you to teach with Meet, but we encourage you to review our full documentation. If you need immediate assistance with these tools, call (757)594-7079, or put in a ticket using this link.
Create A Calendar Event With Google Meet
So that you can reserve a particular link for your meeting, we encourage you to start to set up your Meet meeting in Google Calendar.

There are several ways to add events to your calendar. the easiest way is to click on the start time for the event, and drag your mouse to the ending time.
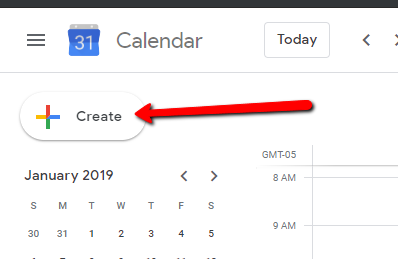
Alternatively, you can click on the plus sign in the top-left corner your calendar and enter the date and time manually.
When you release your mouse, a box will pop up allowing you to name your event. This box will also allow you to enter in certain details, such as location or guests. You can also give the event a title and add further information. You can also add a Google Meet space to the event by clicking on "Add Google Meet video conferencing."

The meeting will be created and tied to this event. You can then get the link for the meeting by copying the URL underneath the Join button, or get the full connection information by clicking the copy button.

You can then post this information in Scholar, to a group email, or any other place that allows you to share links.
Posting The Link To Scholar
Navigate to Scholar and enter the course you intend to use the link with. When viewing the Course Content feed, click the plus sign where you want the link to go and click Create. Note: For times where Google Meet is being used to hold class in an emergency situation, it is recommended that you place the link at the top of the course for easy viewing and access.

Select Link from the list of possible course content items. 
This will open up a window allowing you to add the link. The top of the window will provide an option to set either a Web Link or a Course Link; for an outside location such as Google Meet, ensure that Web Link is highlighted.
Two fields are provided: The URL, and a description of where the link leads. Paste the desired URL into the URL field. Users can also choose whether or not the link will be opened in a new window on the browser, rather than the current one. Select the desired settings, then click Save to post the link into your Course Content feed.

The link will then appear in the content area as shown below. Users can click on the link name to open the link. Note: Instructors will need to use the dropdown below the link name to make the link visible to students.

Joining a Google Meet
If viewing the Calendar event, users can enter Google Meet by clicking the 'Join Google Meet' button added to the Calendar event. If using a link in Scholar, simply clicking the link will navigate you to Google Meet. either method will bring you to the preparation screen for the meeting. If you haven't used Meet on the particular computer that you're using, you'll need to allow it to use your camera and microphone. If you don't, the people you're meeting with will not be able to see and hear you.

Once you click that button, you'll need to click your browser's Allow button.

You'll then see a preview of your video and three boxes below that allow you to select the microphone, camera and speakers you want to use with Meet. If you have a Windows laptop that you regularly connect to a soundbar, you should double-check your microphone after connecting; Windows sets the microphone to the last connected device and your soundbar doesn't have one.

If you want to test your setup, click on the camera dropdown and choose Make a Test Recording. You'll be able to see and hear what others will see and hear directly.

Once you're happy with your setup, click on Join Now on the right and you'll be taken to your meeting.

Screensharing
You can share all or part of your screen with the participants in your meeting. To do so, click the Present Now button.

When you do, your browser's screen sharing options will appear. As we recommend Chrome for Google Meet, this documentation will focus on the Chrome options.

In Chrome, you have three options:
- Chrome Tab: This one uses the least system resources, and is the only way to share audio. However, anything that takes place outside of the tab you choose to share won't be displayed. It's the only option for sharing video, and it has special presentation features if you share a Google Slides presentation.
- Window: This can be used if you only want to share one thing on your computer that is NOT a Chrome tab. However, any menus, dialog boxes, or other popups are not considered part of the window.
- Entire Screen: This will display everything on your screen. You'll need to select a screen whether you have multiple ones or not. Keep in mind that if you select the one that contains Google Meet, you'll see an infinity mirror effect. Simply switch off of Google Meet, and the people viewing your presentation will no longer see that effect.
Once you've chosen the type of thing to share, click on the specific tab, window or screen and click Share.


When you're done sharing, click the Present Now button again and choose Stop presenting.

If you have a Google Slides presentation, or a simple PowerPoint, you can get some enhanced sharing features in Google Slides.
Managing Participants
You can manage the participants in your meeting by clicking on the People button at the bottom right.

By default, participants with CNU e-mail addresses or ones that you explicitly invite will be able to directly join the meeting. If someone else asks to join, you'll see a notification in the bottom right corner where you can admit them to the meeting.

If you have the People panel open, you'll also see them under "Waiting to be admitted".

To mute an individual participant, go into the People panel and click on the blue dots/lines next to their name.

To mute all participants except for yourself, click on "Mute all" at the top of the People panel.

To permanently remove someone from your meeting, click on the three dots next to their name and choose "Remove from the call". Users removed in this way will NEVER be able to re-join that meeting.

Recording Classes In Google Meet
Faculty have the ability to record Google Meet meetings at CNU, which can be useful when needing to provide access to class for students who cannot attend synchronously (ex. in scenarios where extreme weather limits internet access). If you need recording ability on Google Meet and you do not see these recording tools, put in a ticket at help.cnu.edu to request access to recording.
To create a recording in Google Meet, you need to be inside a currently-active Google Meet session. Open the Activities menu on the bottom right.

A sidebar will pop up. If this is blank, you don't have recording permissions and must request them with a ticket at help.cnu.edu. If you do see options, click Recording.

You'll be asked what language you'd like the captions to be. Select the language of your meeting (we HIGHLY recommend that you include captions in any recordings that will be distributed). Then, click Start Recording.

A mini-window appears in the center of the screen, notifying the user that they should be asking for consent of all participants before starting the recording. This is a good opportunity to warn students who may not want to be recorded, allowing them to turn off their web camera before the recording starts. Clicking "Start" will start the recording.

The recording will start and you'll see an indicator at the top right.

To stop the recording, click the recording indicator. Click the Stop Recording button that appears.

You will see a notice that your recording will be stored in Google Drive. Processing time may vary depending on the length of the video–the video will not be immediately available as soon as the recording is done. Google will send a notification email upon uploading the video to your Google Drive. Once the recording video is available in your Google Drive, you can then share it to your students via Scholar.


Please note that any recordings made in a Google Meet space will be uploaded to the Google Drive of the space's host–guests to a Google Meet space may record, but will not receive the recording unless the host shares it with them afterwards.
Posting Google Meet Recordings in Scholar
If you want to allow your students access to the recordings you've made in Google Meet, you should not upload them directly to Scholar. Doing so will give your students a bad viewing experience and quickly fill up your course's available storage. Instead, link the recording directly from where it is in your Google Drive.
Go into your Google Drive, Click My Drive, and select the Meet Recordings folder.

Find the recording that you want to post (the name will match the name of your calendar event). Right-click it (control+click on a Mac) and choose Share from the Share menu.

Change the General Access setting to either Christopher Newport University if you want your students to have to be signed in with their CNU Google accounts to view, or "Anyone with the link" if you don't care if they're signed in.

Click Copy Link.

You can then post this in your class using the same method you used to post the Google Meet link.
Additional Assistance
For additional assistance put in a ticket at help.cnu.edu, e-mail helpdesk@cnu.edu, or call (757)594-7079.